This year has been so busy, that in a search through my archives for a recent project I realized I've been playing catch with food in my fridge on repeat, for months. Catch. Toss. Repeat.
It is true that sometimes I am able make space in my schedule and a grocery run for a deliberate drool-worthy dish (hello
peach and squash blossom pizza,
2x!). Usually though, with the juggle of work projects and my abomination of waste, I eat all the leftovers - giving them new leases on life for our daily sustenance.
Really, there are no complaints. Especially fortuitous is that this method has at its foundation, refined my "let's-spontaneously-create-something-amazing" muscle. Lucky for husband and me, we like eating this way.
Last Sunday's breakfast is a perfect example. Freshly harvested squash blossoms from a neighborhood volunteer and the community garden, some plump shiitakes, and things-needing-using-up frittata. The weather was still quite hot so I opted not to turn on the oven, and instead cooked the thing using just the stovetop.
It turned out gloriously. There was a slight crust on the bottom from the hard seared greens + mushrooms, and soft eggy top studded with delicate flowers.
Scroll down for the recipe......
With a much-needed moment of pause between projects - its own sort of vacation before the momentum of fall kicks in - I thought with all the recent Instagram requests to share a few more recipes from the last week or two. These creations happily passed through the kitchen and our bellies, and they are each worth making for yours.
 |
| Crunchiest summer salad |
 |
| Plump buttery scallops with Meyer lemon, peaches, and fennel |
 |
| Wild blues, blacks, and wineberry galette |
Squash blossom - shiitake frittata
Serves 2-4
1 large handful (or what you have) fresh squash blossoms, brushed of debris and any clingy insects
5-8 shiitake mushrooms, stems trimmed and halved (or quartered if large)
1/4 cup heavy cream
3-5 pasture raised eggs
Parmigiano-Reggiano, for grating
extra virgin olive oil, for sautéing
sea salt and freshly cracked pepper
Add to the foundation your mix of "needs-using-up" greens or other support veggies
I had:
a small gem lettuce
wilting arugula
a handful of parsley
the tops from a bunch of amaranth
a few sprigs of thyme
there were also some wayward pepitas and purslane tips (leftovers from a composed salad)
Whisk eggs and a pinch of salt in a medium bowl until frothy. Set aside.
In a medium heavy-bottomed enameled or cast-iron skillet over medium high heat, brown the shiitakes in a small glug of olive oil on all sides, about 7 minutes total. Add gem lettuce or other greens/veg and hard sear without disturbing, for 3-5 minutes.
Lower heat to medium, drizzle olive oil around the perimeter of pan and lean so that pan sides get a light coating in oil. Use tongs or a wide spatula to prevent the cooked veg from spilling out as you do so.
Pour beaten eggs into pan and arrange mushrooms and greens to your liking. Nestle squash blossoms into mixture, followed by thyme sprigs. Season with s+p.
Tilt pan to one side to allow beaten egg to seep to pan edge and repeat on opposite side, until only a very light surface liquid remains. In a circular gliding motion, use the blade of a silicone spatula to separate egg from inner edge of hot pan. Once that is done, after another minute, give the pan a good jostle to ensure frittata is not stuck to pan bottom. If any portion remains stuck, gently glide spatula under frittata to free it.
Drizzle cream over frittata, followed by grated Parm. Lower heat to medium-low and cover, leaving pan lid slightly askew. After 3 minutes longer, frittata should be just-done. Check, cook a couple minutes longer if needed, then remove from heat.
Give a final shower of Parm - to your liking - and cut into wedges. If you are using soft herbs (dill or chives, for example) add them just before serving. Serve warm or room temperature.
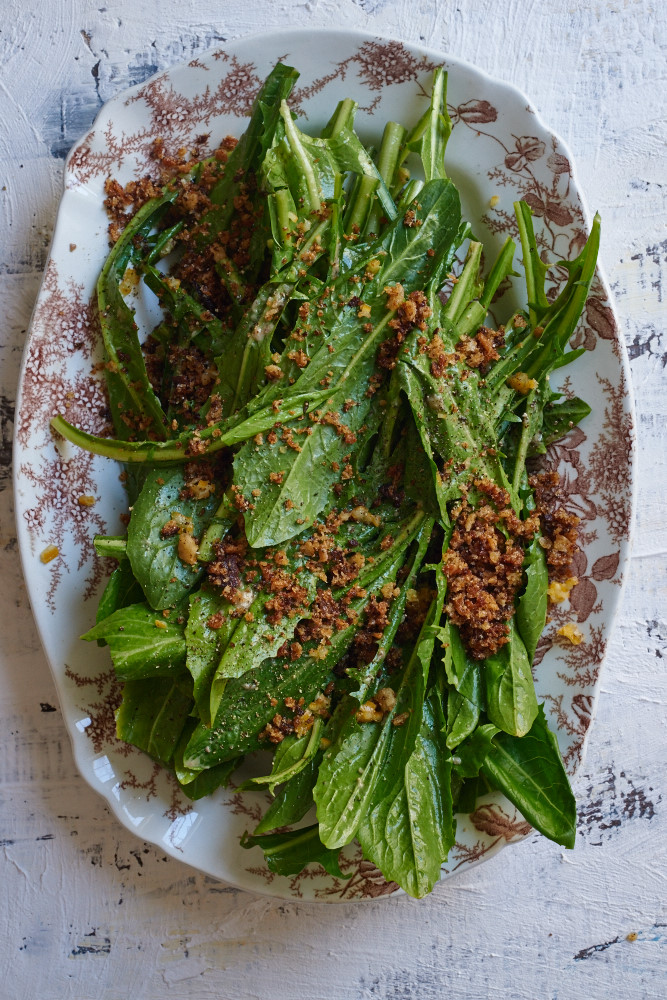
Crunchiest summer salad
Serves 1 hungry body
1 corncob, shucked and silk removed
2-3 small zucchini
pickle brine - I pickled field garlic back in spring and used the brine from it
good olive oil
1 large handful sugar snap peas, ends trimmed and seams removed
1 handful fresh parsley, chopped
1-2 thin scallions, finely sliced
finely grated zest from 1 organic lemon
sea salt and freshly cracked pepper
flake salt, for serving
Make zoodles - I use a mandoline placed over a bowl. Dress zoodles with the pickle brine and a glug of oil and carefully toss to coat. Season with s+p.
Cut kernels off the cob. Use the freshest available as you won't be cooking the corn, and the juicy sweetness fades over time (leaving only starchiness). Slice snap peas on the diagonal and toss with corn. Season with s+p.
For presentation, shape zoodles into nests on a serving dish and spoon corn-snap pea mixture on top. Add as much freshly cracked pepper as you like, and a sprinkle of flake salt. Scatter parsley and scallions, drizzle all with a little more olive oil and another spoonful or two of brine, and serve at once.
Scallops with Meyer lemon, peaches, and fennel
Serves 2
6 large day boat scallops
1 small fennel bulb
2 tree-ripened peaches
1 Meyer lemon
1 tbsp grain mustard
1 tbsp butter
good olive oil
sea salt and freshly cracked pepper
Remove scallops from refrigerator, pat dry, and allow to come to room temp. Season with salt and pepper on both sides.
Trim top and bottom from lemon and place a flat side onto cutting board. Working along the curve, slice skin-pith layer from flesh in strips, turning as you go. Squeeze any juice in the strips into a large bowl then discard. Cut lemon into supremes into the bowl, then squeeze the juice from the membrane.
Cut fennel in half lengthwise. Use a mandoline placed over the bowl to shave fennel, reserving the fronds. Add a drizzle of oil and the mustard, and season with s+p. Gently toss the mixture to combine.
Heat a cast-iron skillet over high heat until near smoking. Add a glug of olive oil and quickly swirl, then place scallops into pan equidistant from one another. They should immediately vigorously sizzle. After a minute or two - do not disturb them - add 1 tbsp butter, dragging it in between each scallop.
Sear for 3 more minutes, tilting pan once or twice to keep the hot fat flowing around them. Turn scallops over and baste their caramelized surfaces with spoonfuls of the hot fat. Repeat basting as you sear for one minute longer, then remove scallops from heat, transfer to a plate, and pour pan juices over.
Cut peaches into slices. On two plates, divide fennel mixture and layer with peach slices and reserved fennel fronds, and nestle scallops on top, pouring the pan juices over all. Add a final sprinkle of sea salt and freshly cracked pepper, and eat at once.
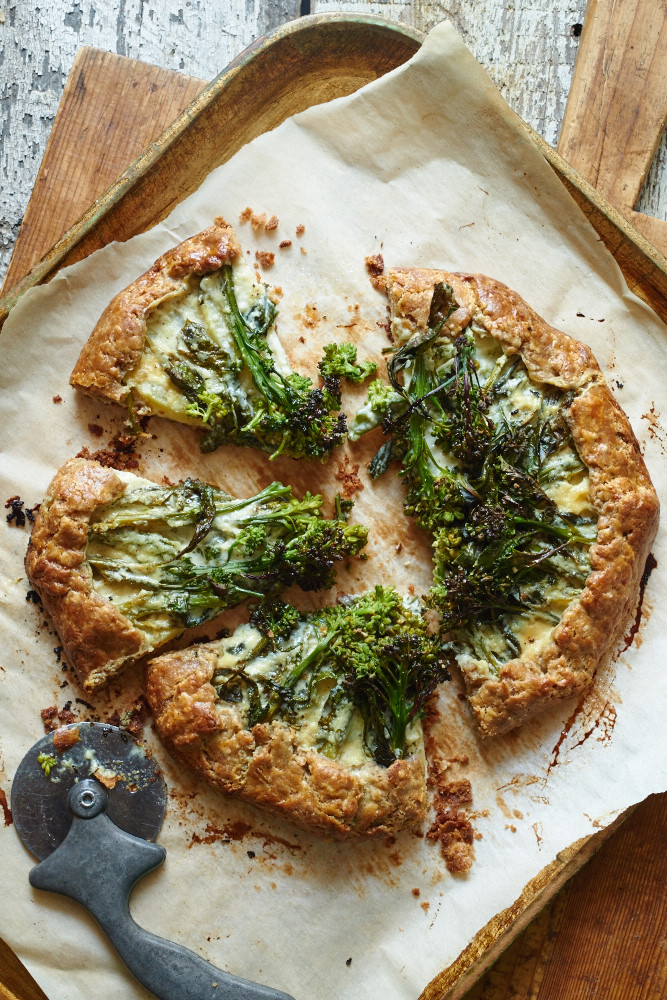
Wild berry galette
Serves 6-8
for the filling
2-2 1/2 cups mixed berries, rinsed and drained - I went foraging and Nature provided this gem-mix of wild black and blueberries, and wineberries
juice from 1/2 lemon
2 tbsp tapioca flour
3 tbsp organic cane sugar
for the dough
1 1/4 cups AP flour
3/4 cup
Honoré Farm+Mill Sonora wheat flour
1/2 cup
Farmer Ground rye flour
8 oz unsalted butter, cut into cubes, freezer-cold
1/4-1/3 cup goat milk plain yogurt
1 tsp organic cane sugar
1 tsp kosher salt
freshly cracked pepper for subtle spice, to your taste (optional)
1 egg, for wash
demerara sugar, for sprinkling
I am a huge fan of mixing dough by hand but truly have not had the time in recent day-to-day work. If you prefer to make dough that way, bravo.
Click here for a bit of guidance.
Pulse dry ingredients in the bowl of a food processor to combine. Add butter and pulse in 3 second intervals until the mixture resembles a coarse meal with numerous pea-sized bits. Drizzle in the yogurt with the machine running at 3 second intervals until the dough holds together. Be careful not to over-mix. To test: remove processor top and if when squeezed, it holds together, it is ready. If not, add a small drizzle more, pulsing as you do so.
Empty dough out onto cellophane laid onto your work surface, into two equal piles. Work all the bits in one pile together into a cohesive ball, then flatten into a disk and wrap securely. Repeat with the second pile. Refrigerate for at least 20 minutes for the dough to mellow, up to 3 days in advance. If you don't have another galette waiting in the wings for the second disk, it can be frozen (wrap in a layer of foil and then a resealable plastic bag) for up to 3 months.
For the fruit filling, combine all ingredients and gently toss to coat. You can do this step a day in advance.
Remove the dough from refrigerator 10 minutes before you plan to roll it out. On lightly floured parchment, roll dough, making a 1/8 turn with each pass of the rolling pin. Be deliberate - if dough is too cold it will split as you roll. If it is too warm it will smear. Transfer dough to a rimmed baking sheet and refrigerate if too warm, or give it another minute or two sitting on your work surface if too cold.
When ready, dough should be 1/8-1/4 inch thick, about 14 inches across. Leave a 3-inch border all around and make a shallow pile of the fruit mixture in the center. Reserve most of the liquid for just before baking.
Fold pastry onto fruit, gathering and pleating as you go. Seal creases together with a light paint of water and pressure from your fingers. On the baking sheet, transfer galette to the refrigerator for at least 1 hour, up to overnight, or freeze for 1/2 hour.
Preheat oven to 400 degrees F. Before placing galette in the oven, whisk together the fruit juices/tapioca/sugar mixture and carefully spoon it over the fruit. Beat egg, paint eggwash all over pastry, then sprinkle Demerara sugar for a light, glittery coating.
Bake for 30 minutes until golden, checking after 20 for even browning. Reduce the temperature to 375 once the crust has become golden brown, baking until the juices bubble, about 10-15 minutes more.
Cool galette completely on a wire rack. Slice and serve plain, or with ice cream or crème fraîche.
Now I want to make each of these again and relive the delight they provided me the first time 'round....
........................
For some of my recent work out in the world:
amazing wild salmon and fried sage gremolata with this season's Driftersfish sockeye and La Tourangelle walnut oil
The New York Times butteriest fish all-Amatriciana, watermelon chaat, and namoura semolina cake
Cover beauty for the newest Edible magazine on the block
Kid Chef minty lamb burgers in the latest Cooking with Kids, Where Women Cook
New best-selling Instant Pot book cover and new Air Fryer cover
Food styling, Knorr selects Pinterest campaign - here, here, here, and here
Follow my daily adventures in food over on
Instagram for round-the-clock inspiration. Make something delicious for yourself this weekend. :)