Showing posts with label gourmet. Show all posts

Sunday, February 25, 2018

Best Food Styling nomination at IACP, Brooklyn Family Food Fest, Winter (wishing for spring) Eating

News that made my week: I've been nominated for Best Food Styling by the International Association of Culinary Professionals! Awards ceremony, tonight. It's terrific company to be in, so whatever happens will be amazing.


There are also recipes to share. Let these images serve as a proper tease, and look for an update here in the next day or two for the full goodies....


In further news, come see me at the Family Food Fest next Sunday. I'll be a participating author sharing tips and tricks with a recipe from Kid Chef, and signing copies! It's March 4 at noon - bring the whole family to experience cooking demos, hands on cooking classes, fun food-related interactive activities and more, at the Brooklyn Marriott. Use code familyfood for $5 off the ticket price - full details here

Hopefully by then, we'll start seeing glimpses of spring. I am r e a d y for it.

Tuesday, November 21, 2017

Otherworldly Pie: make this for your Thanksgiving table

Last year I put my foot down and stayed home so I could prepare a Thanksgiving meal worthy of the knowledge I've accumulated, instead of a mad dash to visit this-or-that family and, well.... not rejoicing in the special food I've grown to love.

I cooked a 9-dish feast, including Paris market carrots in garlic and honey (similar recipe as in my book Kid Chef), a shaved Brussels sprouts salad with hazelnuts and shaved Parm, and my favorite spatchcock turkey (a riff on this beauty). It took a huge amount of effort, all just to feed my husband and me (I was possessed, I'll admit, but it prepared me for this project a couple weeks ago). It was totally worth it.

We ate like royalty for the next week-and-a-half. Many sandwiches and soup were made from the glorious leftovers. :D

It was this pie however, that stopped us both in our tracks. Basically, HOLY SHIT.

I'd seen this recipe in Bon Appetit and was compelled to make it, and then made some tweaks 'cuz I can't leave anything without adding my two cents...

Brûléed spicy smoked pumpkin pie with chocolate crust, adapted from Bon Appetit
serves 8-10

for the pastry
  • generous ¼ cup Dutch-process cocoa powder
    1¼ cups plus 1 tbsp AP flour, plus more for dusting
    3½ tbsp organic cane sugar
    1 tsp kosher salt
    6 tbsp butter, cut into cubes and freezer-cold
    2 tbsp coconut oil, cut into small pieces and freezer cold
    1 large egg yolk
    1 tsp apple cider vinegar
    1 egg, for wash
    demerara sugar, for sprinkling

    for the filling
    AP flour, for dusting
    3 pasture-raised eggs
    2 cups pumpkin or kabocha squash, seeds discarded and cut into wedges
    ¼ cup sour cream or crème fraîche 
    1 tsp ground cinnamon
    ¼ tsp ground ginger
    ¼ tsp ground nutmeg
    ⅛ tsp ground allspice
    ¼ teaspoon cayenne
    ½ tsp kosher salt
    ¾ cup grade B maple syrup
    2 tbsp bourbon (I used Woodford - Bulleit is also good)
    1 cup heavy cream
    2 tablespoons organic cane sugar, for sprinkling
    pecan or apple wood chips, pre-soaked for a couple hours for smoking, liquid reserved


    • To make the dough, pulse cocoa powder, sugar+salt, and 1¼ cups plus 1 tbsp flour in the bowl of a food processor to combine. Add butter+coconut oil and pulse until mixture resembles coarse meal with a few pea-size bits of butter and coconut oil remaining. Add egg yolk and pulse until just combined. Drizzle vinegar, combined with a couple tablespoons of ice water, through the feed tube and pulse until just combined. Squeeze a clump of dough between your fingers: it should hold together but not be wet. 
      Preheat oven to 425 degrees. Turn dough onto a lightly floured surface, flatten slightly, and cut into quarters. Stack pieces on top of one another, placing unincorporated crumbly pieces of dough between layers and press down to combine. Repeat process twice more (all pieces of dough should be incorporated at this point). Shape dough into a disk about 1 inch thick. Wrap in cellophane and chill at least 1 hour.
      Roast pumpkin wedges on a rimmed baking sheet, rubbed with a little good olive oil, for 20 minutes or until beginning to become tender when pierced with a knife - there should be a slight resistance. Lower heat to 250 degrees and transfer pumpkin wedges to a smoker (or to an aluminum roasting pan, set on a roasting rack to separate the wood from the pumpkin, and sealed securely with aluminum foil). Smoke pumpkin for 30-45 minutes over a single layer of wood chips, or until smoky to your liking. Check after 20 minutes to ensure wood is smoking but not igniting. Add reserved soaking liquid as needed to keep wood chips from catching fire.
      Let pumpkin cool fully, then scrape flesh from skin and mash with a fork until smooth. Alternatively, use a hand-held blender and purée. Raise oven temperature to 350 degrees.
      Separate 1/4 of the dough, and roll out the remainder on a lightly floured surface into a 12” round. Transfer to a 9” pie dish. Gently lift edges to allow dough to slump into the dish. Trim any overhang and add to the reserved dough. Separate reserved portion into 4 equal chunks and roll out into thinnish ropes, each about 12 inches long. Twist rope in pairs, then line the border, pressing lightly to affix. Lace ends together for a seamless effect. Chill in the fridge for 1 hour or in freezer 15 minutes.
      Line pastry with parchment paper and fill with pie weights or dried beans. Bake until crust is dry at the edges, about 20 minutes. Remove paper and weights and bake until surface of crust looks dry, about 7 minutes more. Brush bottom and sides of crust with 1 beaten egg and sprinkle twisted edge with sugar. Return to oven and bake until dry and set, about 3 minutes. (Brushing crust with egg and then baking prevents a soggy crust.)
      Whisk pumpkin purée, sour cream or crème fraîche, bourbon, cinnamon, salt, ginger, nutmeg, allspice, cayenne, and eggs in a large bowl. Set aside.


      Pour maple syrup in a small saucepan and bring syrup to a boil. Reduce heat to medium-high and simmer, stirring occasionally, until syrup has thickened and small puffs of steam release, about 3 minutes. Remove from heat and add cream in 3 additions, stirring with a silicone spatula after each addition until smooth. Gradually whisk hot maple cream into pumpkin mixture.


      Place pie dish on a rimmed baking sheet and pour in filling. Bake pie, rotating halfway through, until set around edge and center jiggles just barely, about 50 minutes. Transfer pie dish to a wire rack and let it cool fully.


      Just before serving, sprinkle pie with sugar. Use a kitchen torch, brûlée the sugar to melt and turn into a dark brown "glass" on the surface. I scorched mine in places and the results furthered the overall. A total delight. 

      If you make the pie, please let me know. I was shocked to realize it's been a year since I made it and plan on remedying that error pronto!


      My dear parents arrive tomorrow for a week - to be spent largely in great conversation and similar eating. We will visit family together for Thanksgiving and eat their food, catch up on the year's stories, and return home more full than I prefer. But, there is humanity in connecting with food and folks not exactly like me - something we all could probably benefit from. Happy Thanksgiving!

Thursday, November 9, 2017

Eating Well holiday cover, New York Times Thanksgiving, bright seasonal fare


Thanksgiving and the holiday season are upon us!

Yesterday I had the great pleasure of seeing my work debut for the 2017 New York Times Thanksgiving issue. To have been asked - trusted, even! - with the entire NYT Thanksgiving spread is true affirmation. For that I am over the moon with gratitude.

I single-handedly (with a minor meltdown here or there) cooked, styled, and photographed 9 feast recipes. And then photographed all of them, together. NBD. And then got my act together (aka cleaned my house) to throw a dinner party, since I had enough food to feed a small army.

Here is the full story. Below are some of my favorites with their respective links, should you want to make them!

fennel and apple salad with walnuts and parmesan

classic mashed potatoes

red wine cranberry sauce

smoky braised kale with tomato

sweet potato & Gruyère gratin

roast turkey with orange and sage

classic pan gravy

chorizo dressing with leeks

apple gingersnap crumble
In other Thanksgiving projects, I have been commissioned for seasonal recipe development with La Tourangelle Artisan Oils, and this month's feature is a turkey of my own design.

It might be my favorite preparation ever. The avocado oil imparts an incredible, softly buttery-nutty quality, and that - paired with the dry brine for extra-crispy skin and the spatchcock method (which ensures even cooking) - makes for perfection. Try it for yourself and see: recipe here.


Another exciting project out now is this beautiful cover, styled+photographed for the holiday issue of Eating Well Magazine. I absolutely love the creative kernel the team presented, and producing it was as much fun as it looks. ;)


Working through so many varied projects, I use the imagination of the above towards my fridge-full of leftovers on repeat... To ultimately create simple and brightly flavorful daily eating. Of course. It is lots of fun to make a special-occasion dish. But! There is a quiet glory in the day-to-day nourishment of food.

This salad one of my go-to type meals, where I pull together a bunch of disparate elements and steer towards a representation by my favorite textures and flavors. Here,  crunchy-crispy-creamy-briny-herbacious all get their say. See below for the loose recipe -


Vibrant salad bowl
for 2

2-3 types crunchy elements - 1 each: chioggia beets, hakurai turnips, diced Kirby cucumber
2-3 salady greens or leaf herbs - small handful each: red vein sorrel, purslane tips, purple basil
1-2 wild card additions (think punch, zing) - here, a few nasturtium flowers + a couple tablespoons diced homemade pickles

Thinly slice sturdy veg such as beets and turnips on a mandoline. 

Lay down your greens as a base layer. Arrange the crunchy elements around, accented by the wild card elements. In this instance, I drizzled a little pickle brine, along with some good olive oil, and finished the salad simply with lots of fresh cracked pepper and a little sea salt. 

To fortify the meal, I made this lentil dip to go alongside and modified it with what was available. In this instance, less cilantro but the addition of parsley, some roasted garlic and plenty of sumac, and foraged wild onion blossoms. 

Peeking in on the right are some tortillas leftover from another project, which I pan fried in grapeseed oil until a bit charred and pleasantly crispy, for dipping.

Along the same lines - and perfect at your Thanksgiving table - is this salad, made just today....


Same principles as the previous salad.

Apple and mizuna salad with toasted almonds, grapes, and shaved parmesan 

salady/leafy type green - a large handful each mizuna + romaine
crunchy elements - 1/2 a Granny Smith apple + a small handful toasted almonds
wild card additions - 1 strip lemon zest, sliced very thinly, a handful of grapes, shaved Parm

And again here, I used (a different) pickle brine as the base for the vinaigrette. Good eating indeed.

However you plan on celebrating the holidays, do so conscientiously.

Buy the good stuff, from family farmers. 
Honor the elders and indigenous. 
Cook with people you can learn from, or with those who want to learn from you. 
Share food with those you love.
Make it beautiful. 

Wednesday, November 16, 2016

Sultry Umami Dandelion Greens, Favorite Brussels Salad, Thanksgiving Thoughts


I hadn't planned on making this, a fridge bursting with work projects and all. But I seized upon this bunch of greens so bright and crisp and decided there was room for *one more* recipe, a tangent to indulge myself in the mix of cooking and shooting out-soon cookbooks and far-away magazine stories.

I realized recently that a lot of what I make is what-to-do-with-leftovers, or rescuing food, as I like to call it: creating an exciting meal from the stragglers leftover from work. Sometimes my best eating comes from this spontaneous way of working; I'm not complaining. But it isn't often I go to market and just buy food that I want to make.

A good dandelion salad can be cathartic. I was determined to make the best that I knew how.

And then it almost didn't happen... There was the month-long, seemingly never-ending move (the second in two years!) which had me maxed out. We moved house, office, and studio. Add to that, I am a collector and supply the props for nearly all that I shoot, so this was a certain kind of, ahem, undertaking…. Then hosting family in the first week at new home, new jobs to tackle….you understand.

Despite coming up short for long enough that the greens were near spent, I set aside time and relished the experience. At last.

And, ate almost the entire platter, save for a few stems for dear husband later. So he, too, would know just how magnificent it was.

Consider this at your Thanksgiving feast. It strikes a bright note to offset the many rich foods you may be serving, and is just So. Damn. Good.


Sultry-umami dandelion greens salad

1 bunch dandelion greens, rinsed, patted dry, ends trimmed
2 tsp white wine vinegar 
3 cloves garlic
6 anchovy filets
freshly cracked black pepper
about 1/3 cup good extra virgin olive oil
1/2 tsp finely chopped (rinse beforehand) preserved lemon rind, or more, to your taste*

1/2 cup dry breadcrumbs
a couple good glugs of evoo - or a tablespoon of bacon fat - to fry them in

Over medium heat in a cast iron or enameled skillet, melt bacon fat or heat olive oil until it shimmers in the pan. Add breadcrumbs and mix together. Stirring occasionally, move breadcrumbs around the pan to brown evenly, no more than 5 minutes. Transfer them to a dish.

Mash garlic and anchovies in a mortar and pestle to make a thick paste - kind of like this dressing. Add freshly cracked black pepper and the vinegar, and whisk to combine. At a bare drizzle, whisk in the olive oil to emulsify. 

If you are unsure about the consistency or if the dressing is in fact emulsifying, drizzle the oil more slowly, or stop altogether and look at the whisked mixture. Taste. Keep whisking. Add more oil as needed. The end result will be a deeply savory-tangy, velvety, uniform dressing which coats the leaves once tossed together in a large bowl.

After you have tossed the leaves and coated them well in the anchovy dress, transfer to a serving platter. Sprinkle the diced preserved lemon, then the crisp breadcrumbs over all. Give a final shower of black pepper, and serve at once.

*The idea for the preserved lemon is to impart occasional tangy-pickled citrusy-yum, rather than a heaviness of "salt". So, taste. Add the 1/2 teaspoon at first and see if it is indeed enough. You can add more as you like, or place a small dish with a bit extra beside the salad as you serve it, to pique interest, offering your guests their own taste.

 See that you don't devour every last leaf and crumb.


Yesterday I shared another great salad on Instagram, which received many requests for "recipe please?" It too makes an ideal accompaniment to your Thanksgiving plans….


Shaved Brussels sprouts & apple salad with hazelnuts and Parmesan

15-20 Brussels sprouts, rinsed and ends trimmed
3-5 Granny Smith or Pink Lady apples (any tart, crisp apple is good)
2 lemons
good olive oil
2/3 cup hazelnuts, toasted, rubbed of their skins, and crushed gently under the weight of a pan
shaved Parmigiano Reggiano
sea salt and freshly cracked pepper

Slice sprouts very thinly using a sharp knife or mandoline. Transfer the lacy pile to a large platter or serving bowl.

Slice apples into narrow wedges and add to the shaved Brussels sprouts. Cut a lemon in half and squeeze it over the apple slices to prevent oxidation. Gently toss the apples, lemon juice, and sprouts together. Drizzle olive oil over the mixture and taste for fat-acid balance. Add the other lemon - or just a half - and more oil as needed.

Top with the crushed hazelnuts. Using a vegetable peeler or cheese plane, shave Parm over all. Add freshly cracked pepper, a sprinkle of sea salt, and eat at once.

For more Thanksgiving ideas,

This cornbread dressing I made for The New York Times -


In today's New York Times, which features 15 American Thanksgiving traditions, I produced the ultra cheesy baked Sweeney Potatoes, and the brioche-like Venezuelan "Pan de Jamon." We are a nation of immigrants, of many wonderful traditions, and so much terrific food.


When Thanksgiving has passed, turn your mind to the end-of-year holidays and celebrate with these sour cherry ganache chocolate rye sandwich cookies, my last Bounty column with Where Women Cook. Yes, the Creating from the Bounty column is ending, but don't worry. We dreamt up a new column for the next year, one which features Kid Chef! It'll be out December 1st...


But before Thanksgiving comes - and then goes - I want to share a few organizations that could use our help in the name of justice for all, and giving thanks. Whether you contribute time and/or money, give what you can in lieu of the recent election results.

http://www.foodandwaterwatch.org

https://350.org


http://blacklivesmatter.com/


http://sumofus.org


https://actnow.prochoiceamerica.org/
http://presente.org


Happy Thanksgiving. I hope the journey through this year brought you closer to good food in every form, and to the great people you can cook and eat it with.

Wednesday, July 13, 2016

Savory Crostadas and The Perfect Aioli


I've been baking this season's bounty into lots of delectable galettes and crostadas, i.e. free-form pies.

The tender crumb of buttery crust - recently flecked with citrus or parmesan and black pepper - perfectly cradles sweet or savory fillings. My impulse of late is almost an automatic, "oooh that would be great made into a galette!" You can see why….


One of yesterday's projects was to use the second disk of dough I'd made when prepping the tomato-olive-scape crostada, which - thank you all! - was very loved on Instagram. 

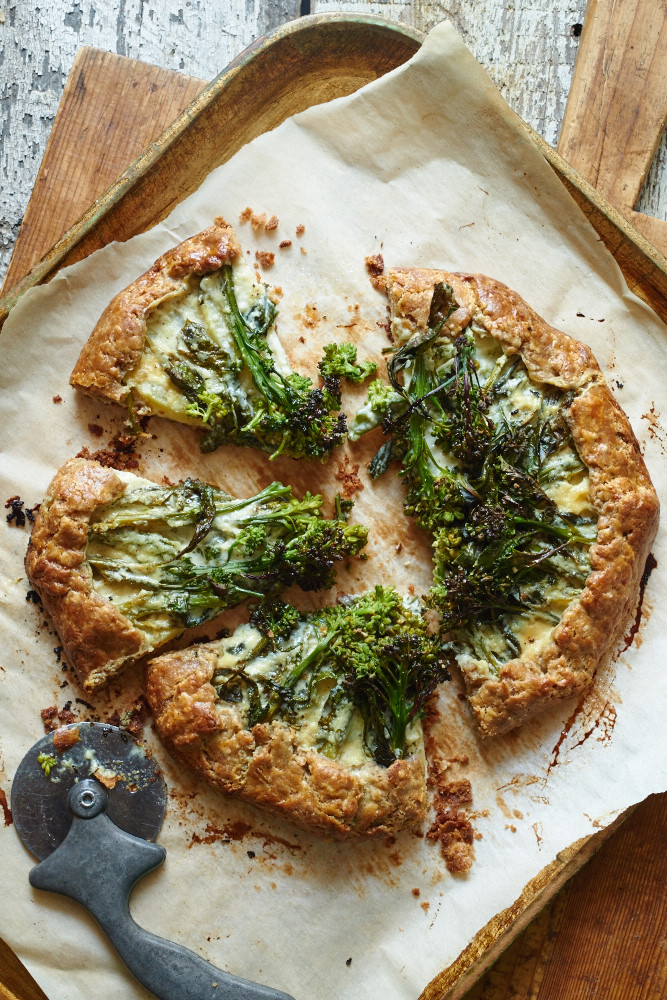
For the broccoli galette, I devised a base layer of barely-steamed waxy potato slices, mascarpone smeared over the potatoes (heavily seasoned with black pepper and garlic, grated on a microplane), and piled on top of that, delicate broccoli stems which I'd harvested while at Seven Arrows last week, where I've been making some time to help out with the huge work that is the season's planting and harvesting.

The dough itself is magic. It is made particularly pliable with the addition of a goldeny yolk egg - also thanks to Farmer Meg and her sweet, plucky free roaming hens

I use this dough often and modify the add-ins (citrus zest/ cheese/ herbs/ black pepper/ etc) depending on what I plan to make.


After thoroughly enjoying how folks responded upon seeing this creation, my week got even better when "proper bad-ass LA made aprons" co. Hedley and Bennett decided to share it, too. 

Which - I am reminded of an important aside - Saveur Magazine is holding their annual Blog Awards *right now* and have created a new category for Best Food Instagram. I pour my heart into Instagram every day and would very much appreciate your nomination! Here is the link to vote - you can do so as often as you like, until July 18th. -> http://lickingtheplate.com <- Best Food Instagram - yippeeee!

Okay, back to the tarts…. ;)

Made with the same parmesan-black pepper-flecked dough, this tart has a base layer of goat cheese I'd made from milk brought home from Seven Arrows' Farm, and seasoned with herbs, boursin-style.

After a good schmear of that onto the pastry (to help the crust from becoming soggy from the juicy tomatoes) I placed tomato slices on top, then studded the surface with torn olives. I had Kalamatas; use whatever you have, in the directions of something deeply savory. 

Before folding the pastry onto its contents I scattered thinly sliced garlic scapes for a little more punch, and then as I folded, sealed the pastry seams with beaten egg.


This crostada was quite easy to make once the dough had been prepped. Plan the time to make the dough, because the results are completely worth it.

Tomato, olive, garlic scape crostada

for the dough
1 1/2 cup AP flour
1 cup whole wheat flour
1 tsp kosher salt
2 sticks butter, cut into small cubes, freezer cold
1 pasture-raised egg
2 tbsp cider vinegar plus 4 tbsp ice water
1/4 cup Parmiggiano-Reggiano, finely grated
lots of freshly cracked black pepper

for the filling
3-5 tomatoes, depending on their size, sliced into rounds
1/4-1/3 cup goat cheese, boursin, etc.
a handful of pitted olives, torn into halves
2-3-inch segment of a garlic scape, sliced thinly
extra virgin olive oil
sea salt and freshly cracked pepper
1 pasture-raised egg, lightly beaten, for brushing onto pastry

Stir together all dry ingredients in a large bowl - flours, salt, grated cheese, black pepper.

Using a pastry blender, cut in the butter, just until pea-sized bits remain. Add the egg and cut in to incorporate. Drizzle in vinegar-water mixture a little at a time, cutting the liquid into the dough, pausing to check and see if dough holds together when squeezed between your fingers. Use only as much as needed for the dough to come together.

Empty dough out evenly onto two large segments of cellophane. With your hands underneath, use opposite diagonal ends of the cellophane to press dough together, into a solid mass. Seal dough in cellophane, then pat into a disk. Repeat with second batch.

Refrigerate dough for at least 20 minutes to allow it to mellow. Remove it 5-10 minutes prior to rolling out. Makes two crostadas, one top+bottom crust pie, or, freeze the second disk (as I did), wrapped in cellophane and foil, then placed inside a resealable bag, for up to three months.

Unwrap dough and sandwich between two sheets of lightly floured parchment paper. Roll out into a circle, 1/4-1/8-inch thick. Transfer pastry to a sheet pan and refrigerate at any point during this process, if it becomes smeary (aka not cold enough).

Peel away the top layer of parchment and begin: leave a 1 1/2-2 inch border and slather on the goat cheese or boursin, followed by the tomato slices. Nestle olive pieces around, and then scatter surface with sliced scapes.

Season the whole thing with freshly ground pepper and a light drizzle of olive oil, then crimp the pastry over the fillings, brushing the seams with egg wash and pressing to seal. Evenly brush the pastry surface with egg wash, then chill for at least a half hour, so that it retains its shape once in the blazing hot oven.

During this time, preheat oven to 425 degrees, with oven rack positioned in the bottom third. Transfer chilled crostada to the oven and bake until cheese bubbles and crust is deeply golden, about 40 minutes. I like to check about halfway through to rotate the pastry for even browning.

When ready, use the sheet of parchment to slide finished crostada to a wire rack to cool. This delightful tart can be enjoyed hot, cold, or at room temp. Perfect for brunch, dinner, or your next picnic.

Broccoli, potato, and garlicky mascarpone galette
2 waxy potatoes, such as Yukon gold, peeled and sliced
4 oz mascarpone
2-4 cloves garlic, depending on your taste
1 handful thin broccoli stems, or 1 head broccoli, cut into thin florets
sea salt and freshly cracked pepper
good olive oil, for drizzling
buttermilk, for brushing

Use the same pastry recipe for this galette.

Lightly steam broccoli until stems turn bright green. Shock in an ice water bath. Briefly steam the potato slices, enough to soften.

Use a microplane to finely grate your preferred amount of garlic into a small bowl (or mince it with a knife and transfer). Add mascarpone, season with salt and pepper, and stir to combine. Set aside.

Roll out pastry as detailed in the tomato crostada recipe. As above, pastry should be transferred on its parchment paper onto a baking sheet once you are ready to make the galette.

Pat potato slices dry and arrange in a concentric circle leaving a 1 1/2-inch border, and slightly overlapping them as you go, as your base. Slather mascarpone onto potatoes. Drain and shake broccoli dry (or pat dry with a tea towel). Measure and cut broccoli into lengths so that when arranged onto the pastry, their florets meet in the center (or, as you like - feel free to get creative). I had enough to make two layers of broccoli; consider which stems are most attractive as you make yours and save them for the top layer.

Fold dough onto fillings, painting the seams with a little buttermilk and crimping to seal, until the galette is complete. Paint buttermilk evenly onto pastry and refrigerate for at least 1/2 hour (or freeze for 15 minutes).

For this preparation I transferred the cold galette onto my pizza steel, which I'd placed to preheat in the oven. The results worked out quite well. If you have a stone or steel, I'd recommend doing the same! Bake with similar timing/attention as for the tomato crostada.

I was extremely pleased with how this broccoli galette turned out and will definitely be making it again! If you make it too, please let me know what you think. ;)

---------------------------------------

Another recent, vocal request has been for my aioli. I made a caper version for my Anthology column some time back, paired with aromatics-poached salmon. I referred to that recipe, minus the capers, for a recent dinner party. 
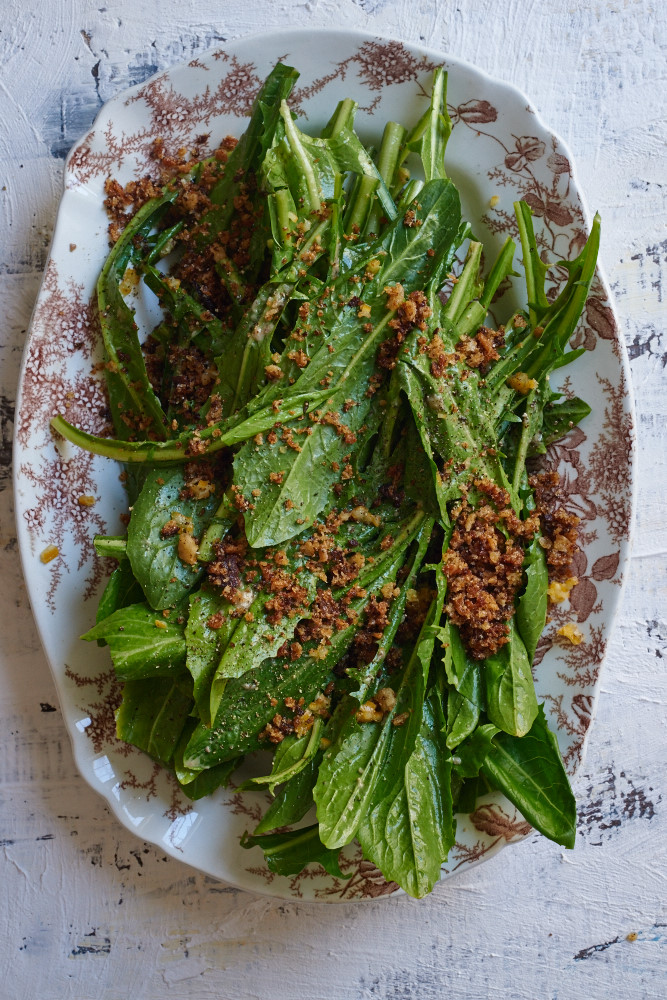
I served it with all manner of steamed and crunchy veg that night and was so present to my guests, I forgot to document the evening (!!).

Here is a plate of leftovers we devoured, the morning after.


And, more of the richly hued leftovers (which you could say I didn't mind having extras of), slathered onto quick & easy pan roasted fish - a seriously great recipe unto its own and included in my new book, Kid Chef. This unexpectedly delicious meal made for an incredible midday interlude.


Perfect Aioli

4 pasture-raised egg yolks
1-2 cloves garlic, finely grated on a microplane, or minced
a pinch of kosher salt
juice from half a lemon
grapeseed oil and good olive oil, to emulsify 

Rest a small mixing bowl onto a tea towel draped over a pot of similar size. This helps the bowl stay put so you can use both hands. 

Whisk together the egg yolks, salt, and garlic. Squeeze a little lemon juice and whisk again. In the thinnest stream, drizzle grapeseed oil as you whisk continuously. You'll add about 1/4 cup or so, stopping at intervals to make sure the mixture has emulsified. Keep whisking! The mixture should thicken; when ready, the aioli should appear plump. 

Add the olive oil now, again in the thinnest drizzle. Add about 1/8-1/4 cup, whisking continuously. Cover with plastic wrap and refrigerate until ready to use.

Thursday, February 25, 2016

My Cookbook: Kid Chef, Available for Pre-Order Now! Plus Special Occasion+Weeknight Recipes, and My Latest with NYT

Blackberry+currant baked-in variation of the Kid Chef brownies

I have been absent. Almost 5 months ago now, I moved long distance, back to the north - a whole story unto itself. And while doing so, I wrote a book. And cooked, styled, and photographed it. Kid Chef: Healthy Recipes & Culinary Skills for the New Cook in the Kitchen, is a fully-fledged thing, about to make its debut in the world. And it's available for pre-order now! Order your copy, here.

I am incredibly proud of what this cookbook has become in the months my editors and I have spent, poring over details, asking questions, refining page-after-page-after-page. It is going to be one of those cookbooks that serves as a real resource for kids and grownups alike, packed with accessible and fantastically delicious recipes. I cannot wait to see what you think.

I am offering the first 300 people who pre-order, signed prints like these, these, and these. Please email me or DM me on Instagram your address, and I'll send them your way! Thank you so very much.

The colorful crunch salad

A sweet moment for sweet peeps

The making-of shot of a long-time favorite….

I cannot believe the enormity of creating the book is now behind me. That reality, and the question, "what'll I do now?" is settling in…but, this is just the beginning! Because, kids and adults everywhere will soon know about Kid Chef and be able to use it in their own lives. Wooohoooo!!!

Please share your family's stories cooking from Kid Chef, by using the hashtag #kidchefcookbook on Instagram, Twitter, and Facebook. As the community unfolds, we'll have lots of sharing and connecting to do!

…………………………………………

In regular day-to-day eating, I spontaneously come up with food to feast on and post it regularly to Instagram. It happens so frequently it is difficult to carve time to post each and every recipe here, especially when I often feel like I'm "just throwing things together."

Repeatedly asked what kind of food I like to cook, I have a hard time defining it because I just want to eat fresh, great food. Does that make sense? The Feedfeed gang requested a few recipes, and because they were either particularly delicious or simple to make, I wanted to be sure to share them. 


With so much beautiful cauliflower in the markets this past autumn, I made quite a number of cauliflower-centric recipes.

One day I had a small epiphany while searching for something new and easy to produce that would deliver big flavor. I definitely found it with this seared cauliflower steak.


I made these pizzas over Valentine's weekend, using a combination of cooked-in-advance and store-bought elements. 

The various toppings made a verifiably *wow* pair of pies, with just little prep work to do before popping the pizzas into the oven. Worth doing on a regular basis for anyone with a busy schedule and foodie interests!


One of my favorite ways to eat is to wilt a giant bunch of greens, and either pick from it over the following days, or eat the whole pile at once.

Flecked with deeply flavorful aromatics, this kind of eating is not only simple and fast, but also truly delicious, and of course, good for your health. This version was an almost-midnight creation, thrown together on a night shortly after we moved, when I needed veggie sustenance.

Barely-done brownies
Makes 6-8

Ingredients
4 free-range eggs
1 1/3 cup light brown sugar
1 cup AP flour
1 ½ sticks pastured butter, cut into cubes
12 oz good semi-sweet dark chocolate, such as Callebaut, chopped
Seeds removed from ½ a fresh pomegranate, for topping

Preheat oven to 350°. Using a double boiler, melt half the chocolate and all the butter. Be careful and maintain just a bare simmer so the water doesn't bubble up into the top saucepan, or it will ruin the chocolate. Once melted, remove pan from hot water bath, wipe the bottom of the chocolate pan with a dry dish towel to ensure no drips, stir butter-chocolate mixture together and set aside.

Line an 8-inch square or rectangular baking dish with parchment long enough that paper extends beyond edges by at least 2 inches on all sides.

In a large bowl, use a fork or hand mixer to thoroughly combine the eggs, sugar, and flour. Add the slightly cooled melted chocolate mixture and the remaining portion of chopped chocolate, stirring to combine all.

Pour mixture into pan. Bake for 30 minutes or until a skewer comes out almost clean. If you agitate  the pan the center should jiggle just a a bit. Cool brownies on a wire rack for 10 minutes in the pan, then use the parchment tabs on either side to lift pastry out.


Cut brownies into squares and scatter pomegranate seeds on top. Enjoy the delicious combo of still-molten chocolate & tart, juicy pomegranate....

Sautéed collards with lemon and aleppo pepper

1 bunch organic collards or other dark leafy greens, stems cut from leaves and finely chopped, leaves coarsely chopped
2-3 cloves garlic, finely grated on a microplane
zest and juice from 1 organic lemon
1/2 tsp aleppo pepper, or to taste
olive oil, for sautéing
sea salt

Heat a large cast-iron skillet over medium heat. When hot, drizzle enough olive oil to coat the pan. Add collard stems and sauté for 3-5 minutes, stirring occasionally.

Add the chopped leaves and stir to combine. Sauté for 3 minutes, stirring occasionally, then add the garlic and stir again. Season the mixture with salt, the aleppo, and lemon juice and stir. Once the leaf membranes have softened, remove from heat and taste; adjust seasoning if needed.

Transfer to plates or a serving platter and eat immediately.


Seared cauliflower steaks with pink peppercorns and crème fraîche

1/2 head cauliflower, cut into slices 1/2-inch thick
olive oil, for pan frying
sea salt
pink peppercorns, to taste
crème fraîche, for dipping

Heat a large cast-iron skillet over medium-high heat. When it is hot, drizzle enough oil to coat the pan. Arrange cauliflower cross-sections to fit, and sear, rotating the pan or cauliflower slices for even browning, and adding more oil as needed. A good crust needs about 8 minutes or so overall, on each side.

Lower heat if needed, and using tongs and/or a thin spatula, turn to the second side, keeping the florets as intact as possible. Repeat with the second side and the remainder of the slices, transferring the cooked steaks to a serving platter or plates.

To serve, sprinkle with sea salt and scatter pink peppercorns, gently crushing them between your fingers as you season. Serve alongside a dollop or two of crème fraîche and dig in. 


Valentines' pizzas 

You can combine the elements in any way you like, or swap out with locally available ingredients. Here is what I did:

store-bought whole wheat pizza dough, divided and formed into balls on a well-floured work surface, cut ends tucked underneath, and rested under a damp tea towel for 30 minutes

for the meat pizza
5-7 slices prosciutto, torn
1 cup King trumpet mushrooms, sliced and sautéed
1 cup chopped, cooked leeks
1/2 cup shredded Fontina cheese
quills from one rosemary sprig

for the veg pizza
3 tbsp roasted tomatoes in olive oil
5 Chinese chives, cut into 2-inch segments
1 cup King trumpet mushrooms, sliced and sautéed
3 roasted artichokes, cut into cross-sections
1/3 cup shredded Fontina cheese
1/3 cup finely shredded Parmigiano-Reggianno

red pepper flakes, to taste

Place a pizza stone on the middle rack and preheat oven to the highest setting for 45 minutes.

On a well-floured overturned baking sheet, shape dough into at least a 12-inch round, or thereabouts. Do so by making an indent with your fingertips - lined up together - 1/4-inch from the edge, all the way around. Gently stretch the dough between your hands. Make sure the entire surface is about the same thickness and lay it onto the baking sheet.

Layer toppings, beginning with the leeks, followed by mushrooms, then the meat, fresh rosemary, and lastly, the cheese. I have successfully transferred the uncooked pizza to the screaming hot stone in the oven, but for a less stressful experience (and if you do not own a pizza peel), I recommend using potholders and bringing the stone out, swiftly and carefully sliding the pizza onto it by pulling its edge while tilting the baking sheet to help it slide, and then quickly replacing pizza-on-stone back into the oven.

Cook for 10 minutes, or until crust is golden and charred in spots, and cheese is melted and bubbling. Remove pizza from the oven, cut into wedges, sprinkle with red pepper flakes, and eat at once.

Repeat the same for the veg pizza: layer first the roasted tomatoes, then the mushrooms, followed by artichokes and chives, and finally, the cheeses, and cook it as you did the first.


……………………………………

In other recent projects, I always love producing with my team at the New York Times. These stories have been out for a bit, but they are no less delicious than when I made them.

This was a beautiful Page 1 story: another fantastic preparation for the humble cauliflower…. It was so good, I've added it to my repertoire.


I also produced this piece, which goes to show you that blogging, wherever you are, and sharing delicious recipes, pays off. This recipe is from a wee town in Mississippi, and now, it is a famous crock pot roast. I made many tasty meals from this project. 


Lots of goodies all-around. I am so happy 2016 is off to this bright start and I cannot wait to see what's around the corner. Good food, no doubt. ;)

Have a delicious weekend, dear ones!